Posts Tagged ‘Ubuntu’
Running Ubuntu desktop on a Macbook Pro
So today, I decided I wanted to try out Ubuntu desktop. I wanted to make sure that a web development project looked correct in all of the browsers on Ubuntu like they look on Windows 7 and Mac OS X. Maybe, that was just the excuse I was needing to finally try Ubuntu desktop.
I have a Macbook Pro 15″ with Mac OS X 10.6.6 installed.
I found that there are 3 main virtualization consoles for Mac OS X.
I chose VirtualBox since it’s an open source project and free. VirtualBox was a Sun project, so it, along with OpenOffice.org, MySQL, and Java are owned by Oracle.
You can download VirtualBox for Mac OS X on their downloads page.
I downloaded and installed the package like any other Mac OS X package.
I also found that you can find several operating system images, which are referred to as “appliances” from virtualboxes.org.
I downloaded Ubuntu 10.04 LTS Desktop here.
It is 2GB, so it may take a while, and once it is downloaded, you need to unarchive/expand it.
Start up the Virtualbox console in the Applications folder.
Click on New to create a new appliance. The first couple of screens are self explanatory.
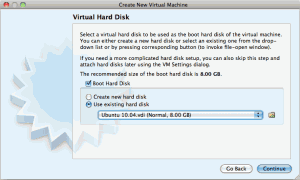
When you get to the Virtual Hard Disk screen, select Use existing hard disk, and use the browse selector to find the extracted Ubuntu 10.04 image that you downloaded from virtualboxes.org. The filename shuld be “Ubuntu 10.04.vdi”
Follow the rest of the screens and the new virtual machine should be created.
If you want to connect to the network via your wireless card like me, you should make one small change before starting your Ubuntu desktop.
Right click on the virtual machine, and select “settings.”
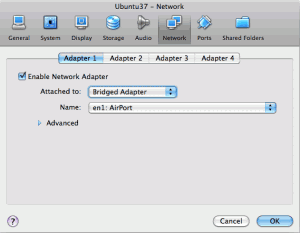
On this dialog, select network, adapter 1, and change attached to from “NAT” to “Bridged adapter” and select the Airport card.
Now you can start the virtual machine.
Once, the machine starts, you will only be able to see a maximum of 800×600 screen resolution.
To fix this, you should install the guest additions.
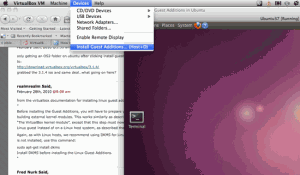
You do this by highlighting the Ubuntu desktop guest host, then go to the Mac OS X menu for VirtualBox VM and select Devices/Install Guest Additions.
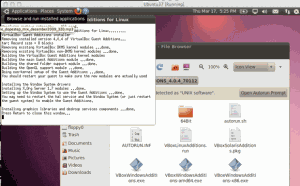
Once, this is installed, go to the Ubuntu menu at the top of the screen and select Places, and then VBOXADDITIONS_4.04_70112.
A file browser windows will open up with the mounted CD image for the VirtualBox additions.
Click “Open Autoprompt Run”
Click “Run”
Once, it is finished, you need to restart Ubuntu from the menu at the top right.
Once, it reboots, you can choose the 1024X768 screen resolution, and if you go to the VirtualBox menu in Mac OS X, you can choose Machine, and then there are several screen options. I choose “Auto-Resize Guest display” or Full Screen Mode.
Happy times with Ubuntu on Mac OS X!
Openoffice.org vs. LibreOffice
I just noticed that there was a new player in town in the desktop office productivity realm with the name LibreOffice.
I was watching a Ubuntu 11 desktop preview video from ZD-Net and noticed that they were referencing the fact that Ubuntu will now come installed with LibreOffice instead of OpenOffice.org.
Low and behold after a bit of research, it seems that key developers of OpenOffice.org are not happy with Oracle’s direction for OpenOffice.org and have defected to a new nonprofit organization called the Document Foundation, which maintains LibreOffice.
In addition to Windows and Mac versions being available, it appears that other Linux software distributors Novell SUSE, Redhat, and Canonical Ubuntu are backing the Document Foundation and LibreOffice as well.
More information here at Infoworld.
This certainly creates a dilemma on which version to use. I think I’ll stick with OpenOffice.org for the time being.
Has anybody tried LibreOffice yet? What are your thoughts?
Review of publicly available Drupal stack Amazon AMIs
Until Pantheon Mercury 1.1 or 1.2 comes out publicly, I wanted to setup a plain vanilla Drupal server for development on Amazon’s EC2 environment.
I wanted the server to have:
- Ubuntu 10.04
- Apache
- MySQL
- PHP
- Drupal
- Drush
- Webmin
- PhpMyAdmin
There are a ton of AMIs out there, so I wanted to find one that was already available and easy to spin up and configure with my server name and database name/users.
NOTE: The preferred method for me, is still going to be to use Pantheon. I was only looking for a short term, temporary image for a development server while we wait for Pantheon to go public/live.
The final result for me was that I spun up a Ubuntu 10.04 LTS server. The latest official Canonical Ubuntu AMIs are are all listed at http://alestic.com for each region. The list is automatically updated with the latest images.
From there, I installed LAMP all in one go with one command, then added Mail servers, PhpMyAdmin, Webmin, Drupal, and finally Drush.
It actually wouldn’t have taken me less time to just do that instead of going out and looking for other AMIs and trying out the ones I found.
Here’s the command to get you started:
$ sudo tasksel install lamp-server
I found 3 main public AMIs for Drupal. Here’s what I thought about each one of them.
Bitnami (http://bitnami.org)
I tried spinning up one of the free Bitnami AMIs on a micro instance. I decided that it was not a viable solution due to poor documentation and non-standard, non-Ubuntu way software is installed such as Apache and Drupal.
If you run on the Bitnami cloud, it’s easy to spin up an instance and backup your instance. There is a flat fee for using their system. For a single server, it’s not worth it ($49/month up to 3 servers, on top of Amazon charges) – http://bitnami.org/cloud/pricing
PROS:
- Up-to-date versions of Drupal 6.20 and 7 available.
- Can run on micro instance.
- AMIs are EBS boot.
- Have a free AMI that you can use in addition to the cloud hosted version with a backup that is similar to Turnkey Linux’s Hub setup.
CONS:
- I found the Bitnami stack unusuable because of the customized installation of Apache.
- It is installed in /opt/bitnami/apache2
- sudo service apache2 restart didn’t work – there is a bitnami specific command to restart it
- Drupal was installed in a non-tradtional way /opt/bitnami/apps/drupal
- By defualt apache was setup such that www.example.com was a bitnami splash page, whereas to get to Drupal, I had to go to http://www.example.com/drupal.
- Changing the default apache root was not-inuitive (I couldn’t figure it out).
- No username/password supplied for PhpMyAdmin.
- Poor documentation
Turnkey Linux(http://www.turnkeylinux.org)
I run another, non-Drupal turnkey linux appliance and it works pretty well, so I was familiar with how their AMIs and general setup works. Their software images are open source and you can download and install on your own hardware. They do not offer a free public Amazon AMI. If you use their Amazon AMI, you kick it off from their Hub. After logging into hub.turnkeylinux.org, you can spin up an instance, and configure automatic backups, similar to Bitnami’s cloud backup feature. They charge 10% on top of the Amazon charges, so it’s pretty affordable for a single server.
I decided against the Drupal AMI without installing it because of the following two cons.
CONS:
- No free AMI version to try like Bitnami has.
- The AMI is an instance boot.
- The AMIs do not support micro instance, so you have to run a small instance at a minimum.
- The AMI was built on a much older version of Drupal 6.16 (not really a big issue).
- The following statement is on their page: http://www.turnkeylinux.org/drupal6
Note: Drupal 6 includes a built-in update status module.
* When enabled could produce confusing/annoying version notifications.
* This is due to drupal6 being installed and updated via the APT package manager, instead of manually from the upstream source code.
I didn’t want to deal with having Ubuntu’s apt-get manage my Drupal updates, I would rather use Drush.
Jumpbox (http://www.jumpbox.com)
They didn’t have a free version to try, so I didn’t try their service. It looks similar in setup and price to Bitnami.
http://www.jumpbox.com/pricing
Quick Drupal install on Ubuntu 10.04 server
Here’s some instructions for doing a really quick Drupal install on Ubuntu server 10.04.
This assumes that you are well versed with Drupal and have already created your database and database user and given the rights to the DB user to access the DB.
Step 1 download, extract, and copy the files into the /var/www root
$ cd /
$ sudo wget http://ftp.drupal.org/files/projects/drupal-6.20.tar.gz
$ sudo tar xvzf drupal-6.20.tar.gz
$ sudo mv drupal-6.20/* drupal-6.20/.htaccess /var/www
$ sudo rm -rf drupal-6.20.tar.gz
$ sudo rm -rf drupal-6.20
Create the files directory and give it the proper ownership
$ sudo mkdir /var/www/sites/default/files
$ sudo chown www-data:www-data /var/www/sites/default/files
Copy default settings.php file to settings.php so that you can enter your own server and database details
$ sudo cp /var/www/sites/default/default.settings.php /var/www/sites/default/settings.php
$ sudo chown www-data:www-data /var/www/sites/default/settings.php
From here you would need to edit /var/www/sites/default/settings.php and enter in our server, database, and database user details.
I would also like to note that you can also install Drupal with aptitude on Ubuntu, but I would much prefer to install Drupal manually and use Drush to update drupal whenever I want to have it updated.
I only want Drupal updated when I say so and with what versions that I decide on.
$ sudo apt-get install drupal6
Installing Drush (at the time of this writing 4.2 is the latest version)
$ sudo apt-get install php5-cli
$ cd /usr/local/
$ sudo wget http://ftp.drupal.org/files/projects/drush-All-versions-4.2.tar.gz
$ sudo tar zxvf drush-All-versions-4.2.tar.gz
$ sudo rm -rf drush-All-versions-4.2.tar.gz (remove downloaded and extracted tar file)
$ cd drush (to make sure the files are there)
$ sudo chmod 555 drush

Create symbolik link
$ cd /usr/local/bin
$ sudo ln -s /usr/local/drush/drush drush
How to configure remote shared access to a git repository on Ubuntu using SSH keys
Requirements: I have a need to share a git repository on a publicly facing server with our development team who are geographically disparate. The team should not have full root SSH access to the server, and the repository should be private (not publicly accessible).
We would like to use SSH keys for authentication so that the developer does not have to type in their password each time they issue a git command that interacts with the server.
These instructions assume Ubuntu Linux 10.04 and Mac OS X client. The instructions are pretty identical if your local workstation is some flavour of Linux. If you want instructions on how to generate a SSH key on Windows, follow these instructions from github.com, which are listed at the bottom of this post.
Begin on the server in question that we’ll call repository.yourtestserver.com:
#create a group for a repository
create group in webmin (gittestuser)
#create a user for the repository and add it to the group.
#Make sure and create a home directory for that user.
create user in webmin (gittestuser)
#give the group rights to the repository – in our example: gittest
chgrp -R gittestuser /srv/repos/git/gittest
chmod -R g+swX /srv/repos/git/gittest
then issue these commands
su gittestuser              # switch to the git user
cd ~                            # change to gittestuser's home directory
mkdir .ssh                   # make the .ssh dir
touch .ssh/authorized_keys      # create an empty authorized_keys file
On Mac OS X client
#generate your local SSH Public key
cd ~/.ssh
ssh-keygen -t rsa -C "david@symetrikdesign-test.com"
# stores it in /.ssh/
cd ~/.ssh
#copy the public key to the .ssh/authorized_keys file for the gittestuser user using
#handy utility called ssh-copy-id
NOTE: You will need to download a copy of the ssh-copy-id script which is not part of Mac OS X for some reason.
#install and set permissions for ssh-copy-id on your local Mac OS X machine
$ sudo curl "http://phildawson.co.uk/ssh-copy-id" -o /usr/bin/ssh-copy-id
$ sudo chmod +x /usr/bin/ssh-copy-id
#once you’ve downloaded the ssh-copy-id script, you want to use it to copy your rsa id to the ~/.ssh/authorized_keys file on the server using the following command.
$ /usr/bin/ssh-copy-id gittestuser@repository.yourtestserver.com
#SSH into the server with root and verify that the authorized_keys file has been updated
$ ssh root@repository.gittestserver.com
$ less /home/gittestuser/.ssh/authorized_keys
#test ssh access using the gittestuser account and that it is using the SSH key, not requiring a password
$ ssh gittestuser@repository.gittestserver.com
#Once, normal SSH access is enabled change the shell for gittestuser to /usr/lib/git-core/git-shell
#so that the only type of access the user has to the server is git.
#First, find out where the git-shell is located:
$ which git-shell
$ which results in "/usr/lib/git-core/git-shell"
#edit passwd file for gittestuser (make sure you are logged in as root if not, use sudo)
$ sudo nano /etc/passwd
#change gittestuser shell from /bin/sh to /usr/lib/git-core/git-shell the following line should look like:
gittestuser:x:1000:100::/home/gittestuser:/usr/lib/git-core/git-shell
I’ve also found that you can change the shell to /usr/lib/git-core/git-shell by editing the user through the webmin interface, which is obviously alot easier.
#Now you can try accessing the server with the shell changed and you should be disconnected.
#The following lines are what you should see when trying to connect via regular shell.
fatal: What do you think I am? A shell?
Connection to repository.gittestserver.com closed.
The reason that you change the shell, is so that your developers can only issue git type commands on the server through SSH access, they don’t get any real SSH access to the server.
#now try to clone the repository from the local Mac OS X machine.
git clone gittestuser@repository.gittestserver.com:/srv/repos/git/gittest/.git
Instructions for Windows that may be helpful to you:
For Windows, the best way to do generate an SSH key is to install Win/msysgit, the instructions for Win/msysgit can be found at github.com
The instructions for generating the key are very similar to Linux, but can be found here.


